Can I back up iPhone to external hard drive?
It is a common question that many iPhone users want to know, especially when their iPhone or iCloud storage runs dry. The short answer is yes - you absolutely can copy photos and other files from your iPhone to external storage. This guide shares four effective methods to transfer photos from an iPhone to an external hard drive.
Before you attempt any transfer method, you should make some basic preparations on both devices. This helps you back up your iPhone photos to an external hard drive successfully.
Here is a quick reference table for how to copy photos from an iPhone to an external hard drive.
| Método de transferencia | Ruta de transferencia | Adaptador requerido | Se requiere computadora | Uso recomendado |
| Direct Transfer via USB Adapter | iPhone → External Drive | Lightning/USB-C to USB adapter | No | Small to medium batches, travel backup |
| Aiseesoft FoneEase | iPhone → PC (External Drive) | cable USB | Sí (PC con Windows) | Large libraries, selective file management |
| Mac Image Capture | iPhone → Mac (External Drive) | cable USB | Sí (Mac) | Mac users with large photo libraries |
| iCloud Desktop Download | iCloud → External Hard Drive | Ninguna | Sí (Mac o PC) | Users who already store photos in iCloud |
Each approach has distinct strengths. In this section, I will walk you through the four methods to transfer photos from an iPhone to an external hard drive.
This is the method most people prefer when they search for how to export photos from an iPhone to an external hard drive. Connect the drive, open the Files app, and copy your photos. In theory, it should be simple. However, in practice, the Files app makes this more awkward than it should be.
Ensure you have an appropriate adapter and use it to connect your external hard drive to your iPhone.
Abra el panel de Archivos aplicación y toque Explorar in the bottom right. Your drive should appear under Ubicaciones. Ir Recientes or Albums and select the photos you want. Tap the share icon, choose Guardar en archivos, then select your external drive as the destination.
When you need to export iPhone photos to an external hard drive with control over file formats and organization, a dedicated transfer tool often beats Apple’s built-in options. Third-party software like Aiseesoft FoneEase provides an efficient way to back up iPhone photos directly to an external drive. It lets you selectively export photos, videos, contacts, messages, and more.
 100% Seguro. Sin anuncios.
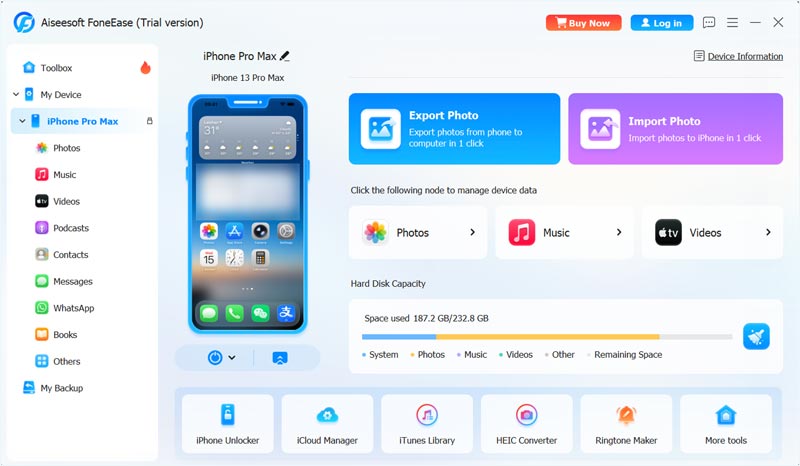
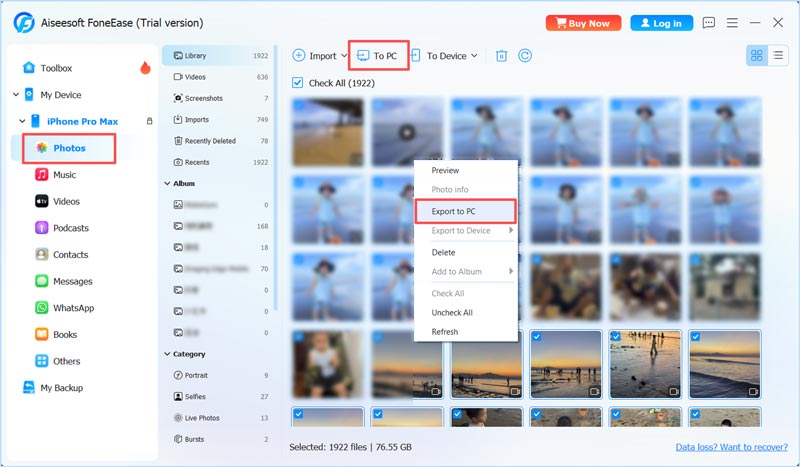
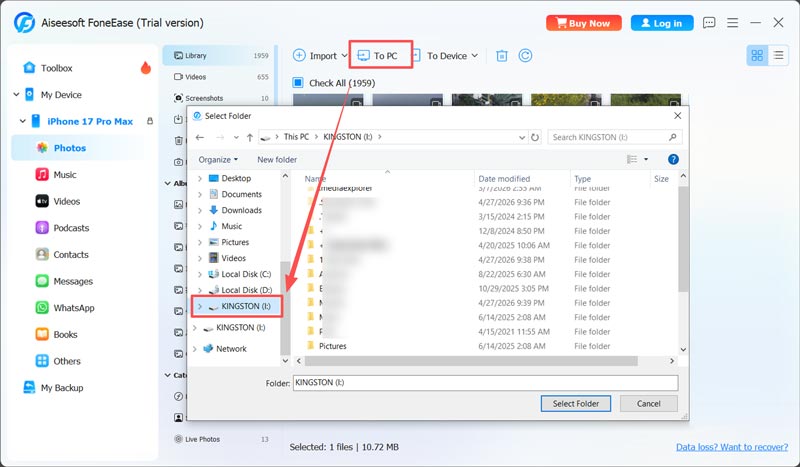
As you can see, it provides a dedicated Exportar foto feature on the main interface. You can use it to transfer photos from your phone to a computer or an external hard drive.
If you use a Mac and do not want to use third-party software, Captura de imagen can be a helper to manage and transfer your iPhone photos. It allows you to export iPhone photos to an external hard drive quickly.
Connect your iPhone to the Mac, then open Captura de imagen. The app lists your iPhone in the left sidebar.
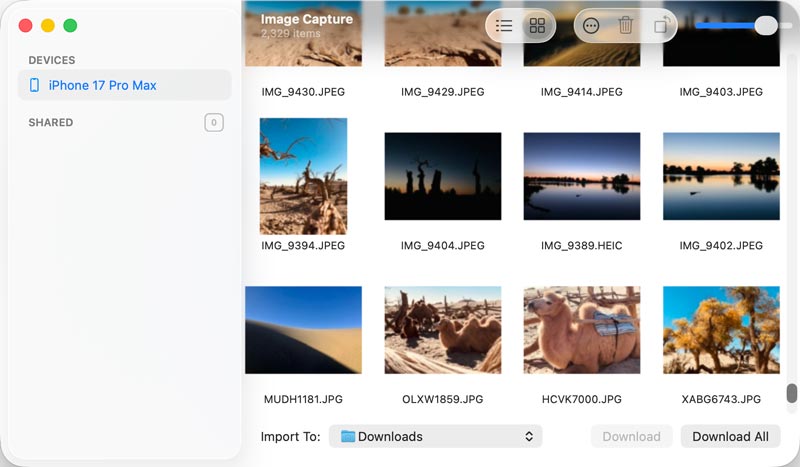
At the bottom of the window, there is a dropdown menu (Importar a) for the destination. Select your external drive instead of the default “Downloads” folder. You can also choose which images to transfer.
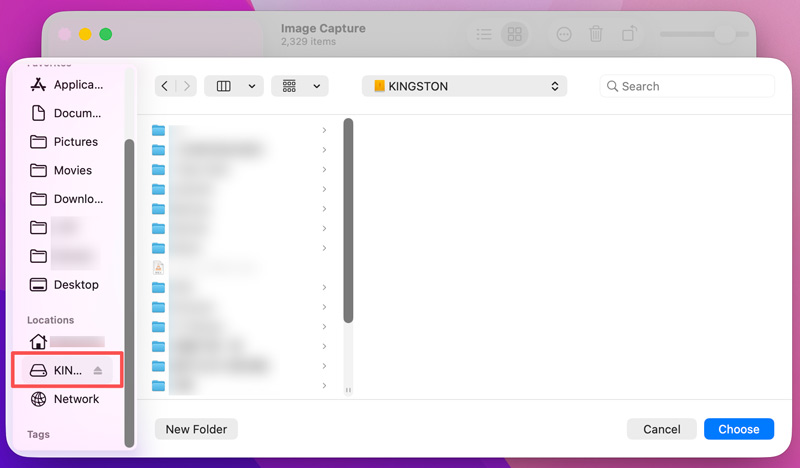
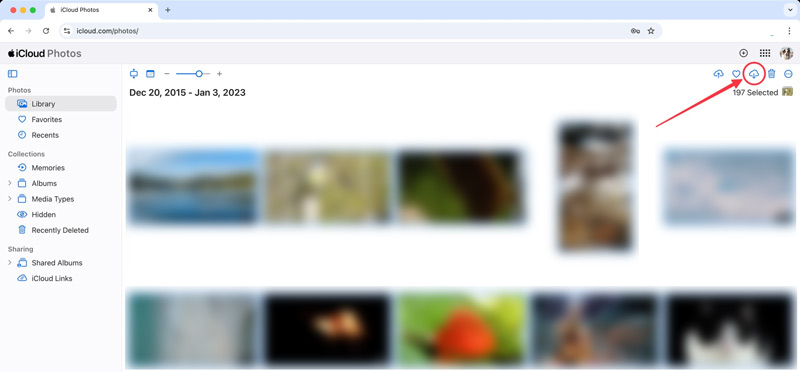
Si ya usa iCloud Fotos to store your entire library in the cloud, you can skip the iPhone connection altogether. Simply download your photos from iCloud directly to your external hard drive using a web browser.
On your Windows computer or Mac, open the official iCloud website, sign in to your account, and choose Fotografías. When you find the images or albums you want to transfer, select them, then click the Descargar icon. When the web browser asks you to pick a save folder, go to your external drive and create a folder there.
Question 1. Why won’t my iPhone recognize my external drive?
Ensure your drive is formatted to exFAT. You can reformat it on your computer. If the drive is formatted as NTFS, it won’t be detected by your iPhone.
Question 2. Can I use the Files app to move photos directly to an SSD?
Yes. When you connect the SSD to your iPhone with the compatible adapter, open the Files app to select your photos, then use Save to Files to make the transfer.
Question 3. Can I transfer photos directly from iPhone to an external hard drive without a computer?
Yes. Using a Lightning to USB 3 Camera Adapter (for older iPhones) or a USB-C connection (for iPhone 14 and newer), you can connect an external drive to your iPhone and export photos directly using the Files app or Photos app.
Question 4. Will Live Photos on my iPhone transfer correctly?
Yes, but only if you use the right export option. If you simply tap the Share button and choose Save to Files directly, the Live Photo will be transferred as a static still image. You will lose the motion and audio. To fix it, you should tap Export Unmodified Original instead of the standard Save to Files.
Conclusión
If you have ever been hit with the dreaded “iPhone Storage Full” notification, you know you should first manage your large photos and videos. When your device is running out of space, use the four methods above to transfer photos from iPhone to an external hard drive and then remove unnecessary photos.
 Solución para problemas de SSD que no aparecen: Soluciones probadas y guía de recuperación de datos
¿Tu SSD no aparece en tu ordenador? Descubre los mejores métodos para solucionar problemas, desde comprobar las conexiones físicas hasta actualizar los controladores.
 Cómo transferir archivos de iPhone a PC en 4 formas simples
En este artículo, aprenderá cómo transferir archivos de un iPhone 17/16/15 a un PC (incluido Windows 11/10/8/7) mediante cuatro métodos sencillos.
 Cómo sincronizar fácilmente tu iPhone con tu iPad usando métodos probados.
¿Cómo sincronizar fácilmente un iPhone con un iPad? Esta guía muestra métodos probados para sincronizar mensajes, contactos, fotos y otros datos de forma segura.

Aiseesoft FoneEase es una herramienta de transferencia y gestión de datos que te permite mover, hacer copias de seguridad y gestionar sin problemas diversos datos entre dispositivos iOS, Android y ordenadores, sin necesidad de reiniciar el teléfono ni depender de iTunes.
100% Seguro. Sin anuncios.

*Campo requerido
*Por favor ingrese un correo electrónico válido